Transvenous Pacing: Procedure Overview
Indications:
- Symptomatic or hemodynamically unstable bradycardia while waiting for placement of a permanent pacemaker
- Inability to perform transcutaneous pacing (i.e. patient unable to tolerate the discomfort, unable to capture or maintain capture with transcutaneous pacing)
- Prophylactic placement in conditions like post-acute MI or new bifascicular/bundle branch block
- Advantages over transcutaneous pacing: more comfortable for patient (and thus smaller sedation requirement/hemodynamic side effects of sedation), pacing wires won’t dislodge as easily
Materials Required:
- Chlorhexidine or other sterile skin prep
- Lidocaine
- Sterile gown/gloves/drapes/eye shield/mask/hairnet
- Central venous access kit
- Ultrasound with sterile probe cover and gel
- Cordis catheter with dilator/introducer sheath (and preferably with aspiration port) (5 Fr)
- Sterile wire catheter sheath
- Temporary pacing electrode catheter/Pacer and wires
- Alligator clips
- Electronic pacemaker generator
- EKG machine
- Cardiac monitor and crash cart (since patient is presumably unstable!)
*note: most of these items will be included in a transvenous catheter kit
Steps:
- Obtain consent if possible in non-emergent situation
- Sterilely prep yourself and the patient
- Set up to perform initial steps of central venous catheterization as you would with any other central line at the site of the right internal jugular vein under ultrasound guidance (preferable) or the left subclavian vein
- Briefly, position patient in slight trendelenburg, administer lidocaine to anesthetize skin if patient is awake, use needle attached to syringe to cannulate vein while continuously aspirating until there is blood return, insert guide wire and advance for at least 30cm, remove needle while holding wire at all times, make small skin incision near wire
- Thread dilator into cordis catheter and click into place BEFORE using it to cannulate vein
- Insert the entire cordis sheath with dilator over the wire
- Remove wire and dilator
- Valve at tip of cordis prevents blood backflow
- Use the special transvenous pacing cordis (5Fr); don’t use larger 9Fr cordis or else there will be a lot of blood backflow/leakage
- Prepare pacing wire
- Put sterile sheath (still compressed) onto pacing wire
- Test balloon at distal end of catheter by administering 1.5cc air, then deflate balloon
- Insert pacing wire into cordis
- For curved wires, thread wire facing patient’s left if going through the right internal jugular vein or facing patient's right if going through left subclavian vein in order to aim toward the heart
- Advance pacing wire at least 20cm (to the 2 black line marking) to get past the length of the cordis before then inflating the balloon. Lock the valve so that the balloon remains inflated.
- The purpose of the balloon is to allow the wire to float in the direction of blood flow and to prevent endovascular damage
- Insert adapters to distal ends of pacing wire and hand off this end to a non-sterile assistant who will hook the negative lead (sometimes labeled "distal") into the V2 input of the EKG machine.
- All the other leads of the EKG should be connected as per usual
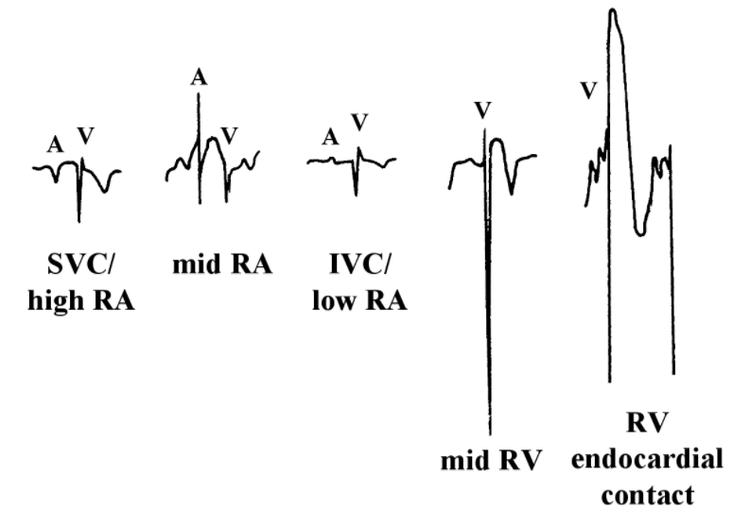
- Advance the pacing wire. Watch for EKG changes as you reach the SVC, RA, RV, and finally the RV apex
- Right atrium: exaggerated P wave
- Right ventricle: exaggerated ventricular spike
- Right ventricle apex: STEMI or left bundle branck block pattern
- The pacing wire should be inserted up to 30-50cm to get to the RV apex. If inserted too far, it can coil and promote clot formation
- Once RV apex placement is established on EKG (you can also verify placement using ultrasound), remove negative lead from V2 EKG port and plug it into the pacemaker generator's ventricular port
- i.e. distal/negative lead goes into negative port, positive lead goes into positve port. Secure leads
- Turn on pacing box, set pulse rate (usually around 80 bpm)
- Turn atrial pacing to 0 since not pacing atrium
- Watch monitor for pacing spikes. Start at a high ventricular current output at around 10-20 milliamps. turn down output until capture is lost (normally at around 1.5 mA), then turn back up an additional 1 mA as the minimum output necessary to sustain capture
- Stretch out sterile wire sheath and secure cordis by suturing into skin
- Confirm placement with chest x-ray and check 12-lead EKG to confirm capture
About the Author

EKGs in pacer wire advancement